Pages

Monday, September 29, 2008

How to make a Paper Bag Pumpkin


Well here's our take on a paper bag pumpkin.
A fairly easy craft you and your kids can make that's cheap to make from everyday supplies.
Materials required:
lunch bags, paint, paintbrush, glue, scissors, 1-2 clothespins, paper for stuffing (we used shredded waste paper), some wire ( this could be pipe cleaners, florist's wire, whatever is in the tool kit ), a stick
You need to paint your bag first. I find this makes a more realistic pumpkin if you paint before stuffing.
Place the bag on your hand like a puppet and paint away. The kids and I talked about how pumpkins can be different colors so we tried to vary our color as we painted from yellow orange to a red orange to a bit of brown or even green.
Let dry.
While you have the paint out, cut open a few bags to lay them flat to paint your leaves.
Again we tried to vary the colors with different shades of green, some yellow, some brown.
If your using pipe cleaners or white florist's wire, you can also paint them green at this time if needed.
Let dry.
When dry you want to cut the bottom off the pumpkin bag and run a bead of glue around the bottom edge inside the bag.
Scrunch it up together trying to get a rounded shape on the bottom. Use your clothespin to hold it together while the glue is drying.
While the pumpkin bag is drying, make some leaves. Take your green painted bag and trace out a leaf shape in pencil on the unpainted side.
Cut it out.
Turn it over and trace around. This way you have both sides of the leaf.
Cut it out.
Put some glue on one of the leaves, lay down your wire, ( I usually form a loop or zig zag it a bit to give something more for the glue to hold on to ), then place the other leaf on top sandwiching in the wire.
You can also make the curly feeder vines at this time. Cut a long strip from your painted green paper and twist it into a rope.
You can also wrap it around a pencil at this point to get it really curly.
When your glue has set up on your pumpkin you need to stuff it. We used shredded paper but you could also just use some crumpled newspaper or recycle some plastic bags for this step.
Don't overstuff as you need some room to close up the top, try to get a rounded shape so it looks less like a lunch bag.
Put a bead of glue around the upper edge on the inside, put some glue on your stick, scrunch up the paper gathering it together, when you are about halfway insert the stick and gather the rest of the bag around it.
Use your handy dandy clothespin to hold it together while the glue sets up.
When dry attach your leaves. I just wrapped the wire around the stick, bend them a little so they look more like real leaves, glue on your curly vine as well.
Make a few, they look great on the table or the mantle. I tried making one out of a large paper bag but the paint did not take as well on the heavier paper. I guess I could try acrylic, but I'm thinking I need a pretty big branch for the stem.
You can also make apples this way painting the bag red, green, or yellow.
I'd also like to try to make a pear using the same method I'll just have to work out the shape.
Give it a try.
see you later
gail

Saturday, September 27, 2008

Virtual Sketch Date

12x9


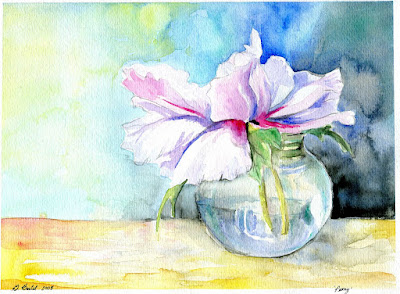
Today is the day we have to have our submissions posted for the September virtual sketch date.

The reference image was a still life of peonies against a black background.

Here is mine.

I started putting in the dark background and then had a change of heart, finding it too overpowering.

This was a tough one for me.

I had difficulty with the vase and all the light and reflections going on. I think I may have overworked it. I will try a second attempt, but I wanted to post this now to get it in on time.


The kids and I are battling over computer time. It seems Runescape is taking priority right now, ....it may be time for another craft.

see you later

gail

Tuesday, September 23, 2008

How to make Gnomes out of Sticks


Here is another good Fall craft to do with your kids. They make a really cute display with your Autumn decorations.


This craft comes from the Gnome Craft Book by Thomas and Petera Berger. It's a cute little book.

Materials Required:

a branch or 2 with a diameter of at least 1 inch, a hand saw, acrylic paint, fine markers, felt for hats, wool roving or moss for beards, glue


First you want to find some branches. They need to be fairly thick. I went for a walk with my son at Bowness park which is a large park in the city. We found lots.


You then need to cut them. This is the tricky part. You need a flat base for the Gnome to stand on and you need to cut the top off at an angle to be able to paint the face in. Make a variety of sizes, this will make a nicer grouping.


Don't worry about odd shapes or little branches they actually make you Gnomes more interesting like the two we did here.


You might want to mark off where the face will go with pencil. This helps your kids with placement.


Now you could paint on the faces but I find this a little frustrating for my kids as they cannot control the fine paintbrush they way they want.


We use fine Micron markers, but you could try any fine marker.


You then can choose which way you want to finish them You can paint on both the beard and the hat. We used acrylic paint.


You could also glue on a bread and a hat. Here we used some moss for the beard. This is our favorite type of beard.


You then can glue on a bit of hair, we used some wool roving, but you could use wool, shredded paper, or even more moss.


We made a simple hat out of felt, measuring first how wide the brim needed to be, cutting it off to a point, and then gluing it together first.

You could also sew these hats together if you want a finished look but the glue works fine.


Glue the hat into place.


I let it open up in the back a bit so I could glue both ends to the stick. This helps keep the hat into position.


Once you get started you just can't stop.


Make a bunch!


Happy Autumn everyone! This is my favorite autumn image. It's from a postcard a supplier sent me several years ago.

Take care.

see you later,

gail

Sunday, September 21, 2008

How to Make Fall Leaves that look like a Metal Sculpture


Here is a technique that turns plain brown paper bags or package paper into a realistic looking metal sculpture.


I know last time we did some fall leaves but I couldn't help myself. I needed to try one more.

(click on picture to see detail)


This requires adult supervision as we use a candle.

Materials Required:

brown paperbags or package paper, tacky glue, wire 18 gauge or so, a candle, matches,

scissors, kleenex or paper towel, some metallic acrylic paint (optional), paintbrush, a bare branch

Lets get started.


Take your brown paper, cut into manageable pieces about the size of your hand. For this project I want 7 leaves but you can do however many you want. Odd numbers usually look better ( the golden rule of flower arranging)

Trace out you leaf shape, you can use the templates from DLTK again if you wish. You need two exact shapes for each leaf.


I just cut the two out at the same time.


Cut wire for the stem. You are going to sandwich it between the two cutouts. Each wire should be about 6 to 8 inches. Mine is black but you can use whatever you have on hand.


Spread some tacky glue on one of the cut out shapes.


Place wire in between, I bent mine a bit so it would be held in place a bit better.


Place other cut out on top matching edges and press to seal.


Do all the leaves. They kinda look good just like this but wait till the next step.


GO OUTSIDE. You want to do the next part in a well ventilated area, there is a bit of smoke from this technique so trust me go outside.


Spread the tacky glue over one side of the cutout leaf.
I used a paintbrush and coated it completely, don't be shy with the glue.


Light your candle. Holding onto the wire ( don't worry it doesn't get hot), hold the leaf with the glue exposed to the flame. Get right down into the flame. The tacky glue is not flammable, instead you will get bubbling and black soot all over the leaf. You need to expose each glue coated area to the flame for about 30 seconds.


Watch that the edges don't catch on fire. This sometimes happens when you are working on the first side. When the leaf is black take out of flame. Coat the other side with glue and repeat.


Your leaf will look like this.


Do both sides of all your leaves. You can cheat and just do one side if your leaves will be arranged against a wall or something where no one will see the other side, its up to you.


Let the glue dry completely. You'll find some areas may be a little white and the glue may still be wet under the black soot. Wait until it has had a chance to set. (this is hard for me as I can't wait to wipe them off to see what they look like)


Using a tissue or paper towel gently wipe the soot off the leaf. You'll find it starting to polish up to a high gloss. Some of the black will stay, that's normal.


At this point you might want to leave them as is. I wanted some gold detail on mine. Click on picture to see detail.


Take some metallic acrylic paint, I used antique gold and I also mixed some fall colors into the gold here and there for a different look, using a dry brush and only a little bit of paint lightly paint the leaf where ever you want some color.


You can then take a paper towel and remove some of the paint so there's just a bit of metallic patina to the leaf.

Let dry.


To make your sculpture wrap the wire end around the bare branch where ever you want a leaf to be.


Gorgeous!!!


Looks like a cast sculpture but its only paper, glue and paint.

You can also do this technique on cardboard. Cut out a mask or animal shape, do the technique and it will look like an expensive metal sculpture.

Click on the photo to see the detail in the leaf.

One final note, if you are interested in joining the Virtual sketch date, the September image has been posted and you have until Sunday to give it a go.

See you next time

gail